
Features Magicblocks.io - IoT | MQTT
This app is used to send sensor values obtained from the sensors in your phone to a specific MQTT client.
It is important to note that although there are many sensors in the app there should be specific sensors in your phone.The type of sensors in your phone varies from the brand and version of your phone.
It is important to first identify the sensors inbuilt in your phone first.Getting StartedTo get started go to the app and click settings (Upper Left hand corner).
Enter the necessary details in the given spaces.If you want to publish data to a specific MQTT broker enter the hostname and the port of it.
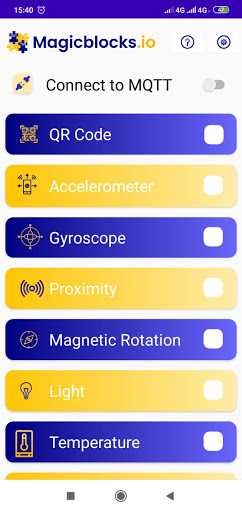
It is also important to specify the publish and subscribe topic.There are also other options that you can try out according to your needs.When operating this app the phone should have a stable internet connection at all times.SensorsQR/Bar Code ScannerScans a QR code with your camera and send the data.
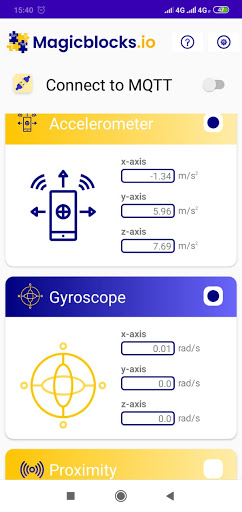
It is important to give the app access to your cameraThe format the data is sent- {"qr":{"format":"QR_CODE","content":""}}AccelerometerAn accelerometer is an electromechanical sensor used to measure acceleration forces.
Units – X-axis ,Y-axis, Z-axis values measured in m/s2The format the data is sent- {"accelerometer":{"x":"2.84","y":"0.44","z":"10.02"}}GyroscopeGyro sensors, also known as angular rate sensors or angular velocity sensors, are devices that sense angular velocity.Units – X-axis ,Y-axis, Z-axis values measured in rad/sThe format the data is sent- {"gyroscope":{"x":"0.0","y":"0.0","z":"0.0"}}Proximity SensorA proximity sensor is a non-contact sensor that detects the presence of an object (often referred to as the “target”) when the target enters the sensors field.Units – distance measured in cmThe format the data is sent- {"proximity":{"x":"5.0"}}LightThis sensor gives the brightness of the areaUnits in lxThe format the data is sent- {{"light":{"illuminance":"7.0"}}TemperatureProvides the temperature in the room.Units in celciusThe format the data is sent- {"temperature":{"temperature":"7.0"}}PressureMeasures the room pressureUnits in hPaThe format the data is sent- {"pressure":{"pressure":"1009.56"}}LocationGive access to the app to access location.
It gives the latitude and longitude location of the device in degrees and also the altitude of the current location in metersThe format the data is sent- {"gps":{"alt":"0.0","lon":"80.06","lat":"6.72"}}SettingsGo to settings on the top right corner.
These are the settings that you should change to make your custom application.
There are some requiredfields as well as optional fields that you should fill to get the app working.Hostname – You should enter the name of your broker in this field.
There are some free MQTT brokers we recommend you to use.
They are,broker.hivemq.commqtt.eclipse.orgThis is a required field.Port- This is also a required field.
It is best practice for you to leave the port default (1883)Username- This is an optional requirement.
It is good to add username for more security.Password – This is an optional requirement.
It is good to add username for more security.ClientID - This is an optional requirement.
If left blank the application will generate a clientID for the user.Publish Topic – The user should specify the topic to which he/she is sending data to.Subscribe Topic – The user should specify the topic to which the application should listen to receive data.Data Push Interval – The rate at which data should be published.QoS – For more information on MQTT QoS visit the official website of your MQTT broker.After specifying the required field click save and go to the home page.
Slide the slider to connect to the MQTT broker.
If all goes well you will see ‘connected’ on the screen
Social Features
Connect and share with friends and the community.
Camera Features
Advanced camera features with editing capabilities.
Weather Features
Get accurate weather forecasts and real-time updates.
See the Magicblocks.io - IoT | MQTT in Action

Get the App Today
Available for Android 8.0 and above